Heat Exchange Snobbery
The recipe for beer is pretty simple. One important step is boiling the wort, the sweet mixture that yeast will ferment into beer. Boiling sanitizes the beer so that yeast can work its magic, but not before the wort is cooled back down or the yeast meets the same quick, steamy end as its potential competitors. There are many ways to cool wort, but I recently upgraded my cooling technique to the optimum method: countercurrent heat exchange.
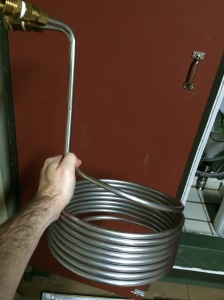 I previously used this immersion cooler. This is a good method in which a length of coiled tubing is placed into the wort. Cool water is pumped into one side and it comes out hot on the other, all the while cooling the wort. Despite the ease of execution of an immersion chiller, it’s limited. Initially, there is a large temperature difference between the wort and the cold water running through the chiller, and it works well. As the wort cools, the temperature difference between the wort and the water decreases, and the cooling is less effective. It takes more and more water to accomplish the same heat transfer. Countercurrent exchange doesn’t suffer this limitation, and this is why it’s a superior heat transfer method. How it avoids this limitation can be demonstrated by comparing the countercurrent configuration to the parallel configuration, which is somewhat similar to the immersion chiller method. Here’s a diagram showing both flow configurations:

Both involve a tube within a tube. The inner tube is usually made of thin metal so that the fluids can easily exchange heat across the metal. In the parallel configuration, hot wort is introduced at the same side as cold water. As the wort and water flow through the tube and exchange heat, they approach the same temperature you would get if you mixed the two in a bucket (ignoring the thermodynamic effects of mixing). In the countercurrent configuration, hot wort is introduced at one end and cold water is introduced on the other. This results in a very different temperature profile for each fluid along its path. Check out this diagram from Engineering Toolbox:
The result is that the wort is continuously cooled throughout its path while the cold water is continuously heated throughout its path. To phrase this more practically, you more fully utilize the cooling ability of all the water you use. Unlike the immersion chiller that only heats the first amount of water to near the starting wort temperature, all the water used in a countercurrent heat exchanger will be heated near the starting wort temperature. While countercurrent heat exchange is limited by the surface area and the flow rates, so are other methods. For any exchange method, too small a surface area or too high a flow rate and the fluids don’t have a chance to exchange enough energy. Countercurrent exchange is not equilibrium limited, and this is the difference.
Countercurrent exchange isn’t just an engineering technique. It evolved biologically and is evident in many homeostasic mechanisms. My favorite is the kidney, an analogous example of countercurrent mass transfer. Remember those tubules and the sodium gradient? That’s countercurrent exchange, nature’s way. There are heat exchange examples in nature as well.
Now that countercurrent exchange is justified, it should be implemented. Even though there are commercially available, reasonably priced countercurrent plate chillers designed especially for home brewers, that’s too easy! Here’s the tube-in-a-tube heat exchanger I built:

The design is simple. The outer ports connect to a 3/8″ stainless tubing coil that, with great lubrication, forcefulness, and bleeding, I managed to shove inside a length of garden hose. Wort is pumped through the stainless tubing in one direction while tap water flows through the hose and around the outside of the tubing in the other direction. 3/8″ compression fittings seal the internal path from the external path. 1/4″ compression fittings house in-line DS18B20 temperature probes that I’ll eventually use to monitor and optimize heat exchange. As always, cam locks attach the hoses attachments. I fastened the coil with rope and hung the exchanger in the roof of my cabinet so that cooled wort can go directly to the conical fementer. Here is the entire system in a test:


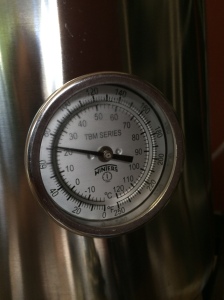 For the test, I brought the whole system to 80 degrees Celsius and let the wort out of the exchanger flow across my kettle thermometer. I had to cut the flow rate down, but I was able to get the outlet temperature down to almost 20 degrees Celsius in one pass.
This will be my last modification to the system until after boards, but I should have a few brew posts. Right now I’m growing a yeast culture for a 10 gallon batch of Dubbel, which will hopefully sate everyone for a little while. My friends sure can put away some home brew.
Pingback: Work with your hands | Overdesigned Brewing
Where did you get your stainless compression fittings for the DS18B20?
Ebay. I get all my stainless fittings from ebay.