
Continuous Measurement of Fluid Density, Part 1: Concept and Design
Introduction
One of the chores every brewer performs is measurement of the density of a fluid. This measurement gives two critical data from the brewing process. First, a measurement right before fermentation tells how much sugar is in the wort. This is called original gravity and is one of the key parameters of any beer recipe. A large portion of the work that goes into a brew day is to control the quantity and types of sugars that are in the wort. Second, since the density of the beer decreases as the yeast convert sugars to ethanol and other byproducts, measurement of density allows the brewer to monitor the progress of the fermentation. When fermentation is complete, the last density measurement is called the final gravity. The difference between the original and final gravities can be used to calculate the alcohol content of the beer.
There are two methods available to brewers to measure density. The simplest device is the hydrometer, a glass bob that is submerged in a cylinder of liquid. The denser the liquid, the higher the hydrometer floats. The other device is a refractometer, which measures how much the fluid refracts light. Sugar and alcohol in the beer change its refractive index, so a few calculations can yield the concentration of sugar and alcohol in the fluid.
Considering how important a task this is, it’s embarrassing to admit that I absolutely hate doing it. Each of the above methods requires collection of a sample of the fluid. I don’t mind this on brew day, but collecting a sample from the fermentor using sanitary technique is a hassle. I like to be hands off during fermentation; that’s why I went through the trouble of building an automated temperature controller. It’d be great to add density measurement to my existing system.
I’ve been slowly tinkering with a solution, but the idea of automatic specific gravity measurement on a homebrewer’s scale isn’t new. The homebrew forums have been kicking ideas around for years, and have beaten it to death. Then, the Beer Bug hit the scene with what is probably the best solution. If I’d known about it sooner, I probably would have bought one. However, I’ve put a fair amount of work into my prototype, and I’d like to see it through.
P&ID Legend
There are a few diagrams to follow, and I’ll use symbols that are mostly self-explanatory. Two that may not be well known require some explanation.![]() This is a manual valve. It sits at the bottom of my fermentor. I open it when I want to collect yeast or transfer the beer to a keg.
This is a manual valve. It sits at the bottom of my fermentor. I open it when I want to collect yeast or transfer the beer to a keg.![]() This is a check valve, or a one way valve. It allows fluid to flow in the direction of the arrow, but not the other direction.
This is a check valve, or a one way valve. It allows fluid to flow in the direction of the arrow, but not the other direction.
Concept
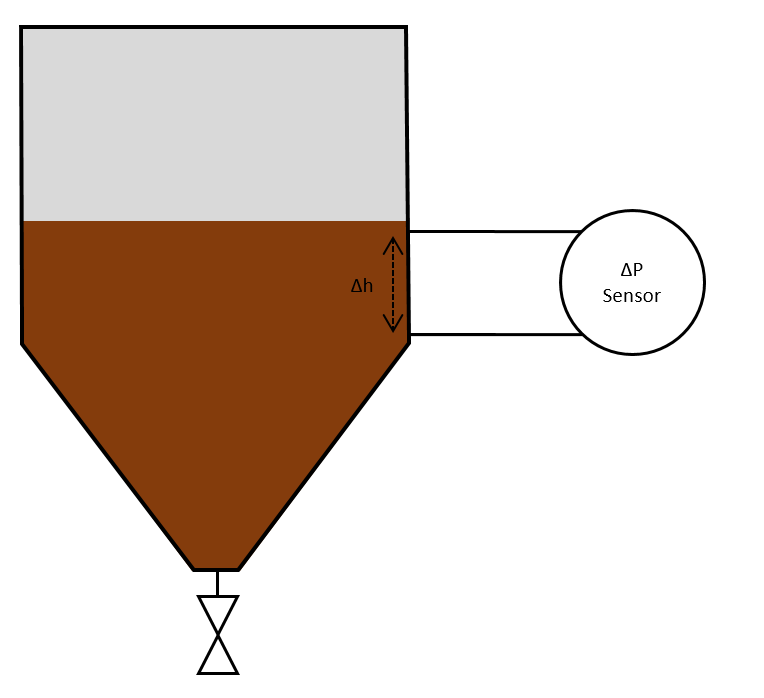
One of the simplest ways to find the density of a fluid is to measure the pressure caused by a height of the fluid. The diagram above shows the fermentor and two ports at different heights connected to a sensor. The differential pressure measured by this sensor can be used to calculate the density with the following formula:
$latex \Delta P= \rho g \Delta h$
$latex \Delta P$ is the pressure difference between two points in the fluid
$latex \Delta h$ is the height difference between the two points
$latex \rho$ is the density of the fluid
$latex g$ is gravitational acceleration
While this is straightforward, the difficulty lies in the design. The density of the beer will change by no more than 10% from start to finish, so changes of even 0.1% of the scale of the transducer can be significant and indicate that fermentation is still active. Since detecting cessation of fermentation is the most important goal, the precision of the system will need to be within this order of magnitude.
Design
The first design challenge is selection of a sensor. Differential pressure sensors are expensive devices. A device that has the required accuracy, tolerates liquids, and is food safe would easily cost hundreds of dollars. There are much cheaper differential pressure sensors available, but they don’t tolerate liquids and aren’t food safe. Fortunately, with some creative design, they will serve the purpose.
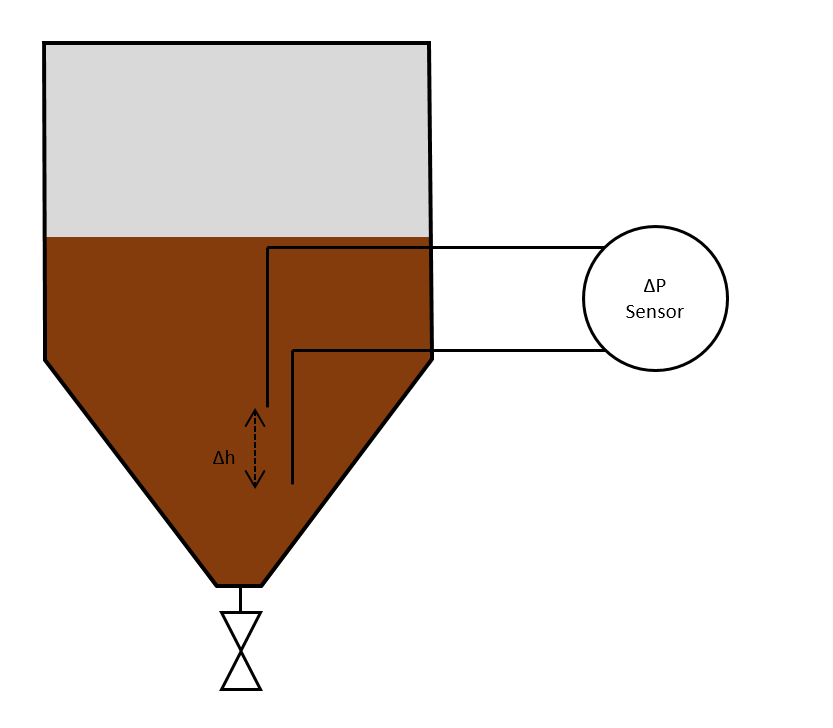
The above diagram shows the first change necessary to allow the use of a cheaper sensor. Instead of attaching the sensor directly to the wall of the fermentor, it is attached to dip tubes extending down to different heights within the fluid. This keeps beer from directly contacting the sensor, which means it doesn’t need to tolerate liquid or be food safe. Instead, gas will transmit the pressure from the dip tube to the sensor.
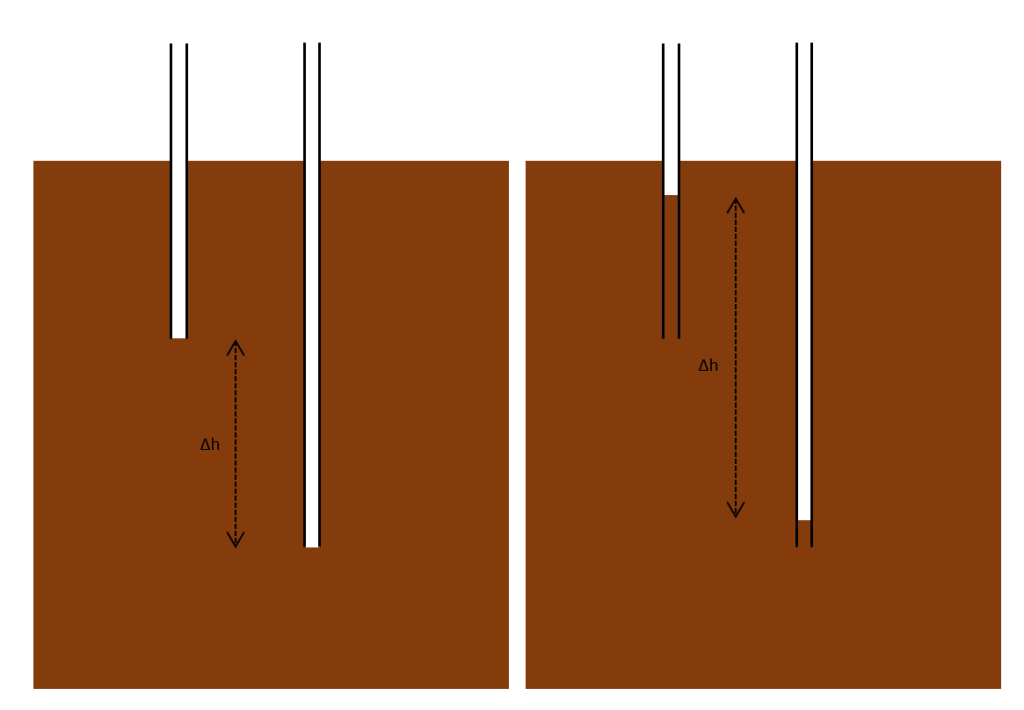
The above diagram shows the problem with this approach. The left panel shows the desired configuration, but the right panel shows liquid rising into the tubes. In the right panel, the height of the liquid is different than expected, making the calculated density incorrect. To fix this problem, one more change to the design is necessary.

This shows the addition of a small vacuum pump leading into the dip tubes. Check valves prevent the reversal of flow and isolate the tubes from one another as well as from the gas in the top of the fermentor. A microcontroller will occasionally power the pump, which will pull gas from the top of the fermentor and push it into the tubes, clearing any liquid. The pump will then be turned off to allow for the measurement of the pressure difference between the two tubes.
Rejected Design

Commercial transducer with a metal isolation diaphragm
One thought worth mention is diaphragm isolation. This was an idea that was discussed in the homebrew forums and that I had also considered. Diaphragm isolation is a technique for measuring the pressure of a fluid while keeping the sensor separate from the fluid by placing a thin layer of material between the medium and the sensor. The space on the side of the sensor is filled with an inert hydraulic fluid. This would be another way to solve many of the above problems. Interestingly, it would also have the added theoretical advantage of greater accuracy since the height of the hydraulic fluid would have to be subtracted from the height of the beer. This would allow the use of a sensor with a smaller range, yielding greater accuracy and precision. I considered this approach for a time, but decided against it after a conversation with my father, my personal engineering guru. Here are the reasons why:
- Isolation diaphragms are expensive.
- A sensor that can tolerate inert liquids is much more expensive than one that is made only for inert gasses.
- Thermal expansion and contraction of the hydraulic fluid would cause considerable error, likely greater in magnitude than the required precision.
- The elasticity of the diaphragm and the tubing becomes a source of error with an isolated hydraulic connection, also likely greater in magnitude than the required precision.
While theoretically advantageous, isolation diaphragms are not feasible for low pressure, low cost applications.
Next Installment
In my next post, I’ll discuss the components of the system, pertinent specifications, and plumbing.
Hi!
Congratulations for your project!
When you’ll do your next post about this ptoject?
Thanks.
Hi Fabio,
I had some trouble with the check valves I was using and was having rapid pressure loss in the lines. The new check valves came in last week. Once I get a chance to put them in and run some tests, I’ll create a new post! I hope this will be published in 3 or 4 weeks.
Tyler
*bump*
Reading about your nerdy beer adventures has brought me much entertainment, and I demand more.
The results from the device were poor. There’s a slight gas leak in the tubing that connects to the differential pressure sensor I selected that drastically decreased the precision of the measurements. Precision was already going to be a problem since I’m using a cheap sensor usually used for airspeed, and this added imprecision just crushed chances of meaningful data. I was planning on rewriting the measurement algorithm to measure immediately after the compressors turn off, but then the system got contaminated with mold. I hope to finish this device and make it a regular part of my brewing process, but it’s on hold for now.
Still, all the pictures of the plumbing are sitting in cloud storage. I’ll try to whip up the next post, even if it doesn’t work.