Under Pressure!
I finally pressure tested my fermentor!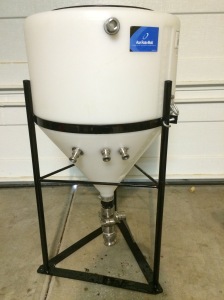 Several brewers have made conical fermenters using plastic tanks. These tanks have the benefit of a valve at the very bottom. This allows the removal of trub (dead yeast) without transferring to a whole new vessel. The disadvantage is setting up a conical fermenter takes a little more work.
 Using a simple ball valve on the bottom is problematic. Ball valves have a recess between the body and the ball that collects fluid. For sanitary operations, these would have to be sanitized with heat and occasionally disassembled. A superior approach is a butterfly valve. These valves have no recess to collect fluid, but are mechanically more complicated since the disc has to mate with a gasket. They’re typically much more expensive, but I found a couple of beautiful 1.5″ stainless butterfly valves with silicone gaskets for nearly nothing on eBay. A couple of tri-clamp adapters from Glacier Tanks and a 1.5″ camlock adapter from ProFlow Dynamics makes my valve assembly.
 Unfortunately, this is where things got tricky and delayed the project. I failed to account for the length of this valve assembly when designing my Fermentation Cabinet. I also designed the doors of the cabinet to account for the tank but not the metal frame. To make an embarrassing story short, I attached hooks to the tank walls for hoisting it into place using small pulleys in my cabinet. The hooks are attached with stainless bolts and washers, which are internally sealed with 1/4″ silicone o-rings and gaskets I made using silicone sheet and punch tools. I built a simple frame into which the tank is lowered in the cabinet, giving enough clearance for the valve assembly.
I also wanted to add an immersion coil, something I haven’t seen anyone do with a plastic conical yet. This will make my temperature control system more efficient since I’ll pump the heat exchange medium (I use water) directly through the tank instead of heating or cooling the air around the tank. I got some 3/8″ stainless tubing on eBay that sat in someone’s closet for a couple of decades and a couple of stainless compression fittings. I discovered two things when making this coil. First, bending stainless tubing is not easy! I invariably end up bleeding every time I do it. I wasn’t able to make perfectly smooth bends in the long segments, but the small kinks are only cosmetic and may even improve overall heat transfer by adding turbulence. Second, the walls of the plastic conicals are thicker than stainless vessels. Getting the male NPT fittings through the vessel wall required NPS locknuts from Bargain Fittings. I also wasn’t able to place a washer between the camlock adapter on the external side and the tank. I’ll just have to hope it doesn’t break.
I also added a camlock adapter below the liquid level for a temperature sensor and another near the top for a blow-off tube.

 Finally, I pressure tested the vessel by filling it to the brim. There weren’t any leaks through the wall, but one of the compression fittings had a slow leak. Coolant contamination of the beer being undesirable, I attached a manual air pump to the immersion coil, clamped the other side, and pumped it up to visualize the leaking fitting. I tightened it until I couldn’t make it leak anymore, which is lucky because I don’t think I had enough muscle to tighten it further. I checked it once more by draining the tank and attaching it to the house water line with the other end clamped.
All that’s left is to seal the lid attachment using silicone and the tank will be ready for use! Of course, cleaning this thing will be a pain, but I have a plan for that.