OneWire Header
Measurement of temperature is important to many stages of brewing. There are lots of options out there, but I decided on the DS18B20. What’s different about this device is that it’s not just a thermocouple or thermistor but a self contained chip with which you communicate digitally. The device communicates via the OneWire protocol, so multiple such devices can be connected through a single digital pin simultaneously.
The protocol is involved, but there are two Arduino libraries that make getting these devices up and running a snap. The OneWire library provides for the basic communication protocol while the DallasTemperature library abstracts the specific commands for the DS18B20 and similar devices.
The tricky thing about these thermometers is the wiring. Hooking up one or two is straightforward, but my first attempt at connecting five of these for my Fermentation Cabinet failed miserably. A little browsing of the forums revealed that I had used wire with too high an impedance and had used a star topology when connecting these in series allowed for more reliable communication. I bought some CAT5 cable, RJ45 plugs, and a crimping tool and got down to business.
I spliced the thermometers to one end of the cable, connecting two-to-one. I crimped two plugs at the other end of the cable. One faces toward the microcontroller while the other connects to the thermometers further down the series. The cables are connected to one another by female-female adapters. This way, power, ground, and data all connected completely in series.
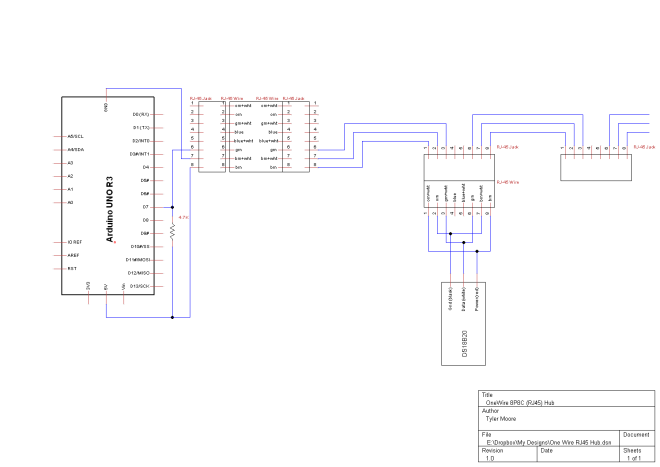
The connections were not very secure, but rubber bands around the adapters held everything in place. The cabinet ran fine this way for months without connectivity problems. Even so, I decided a cleaner solution would be useful while working on my all grain design, which would require that I be able to assemble and disassemble the electrical connections for cleaning and storage. Here’s the diagram:
This allows each cable to have only one plug and eliminates the need for all the female-female adapters, but it needs a special header for connecting the devices in series. Using a readily available Ethernet splitter board would have been nice but would have resulted in a star topology. Drafting a board and having it fabricated was fast, easy, and inexpensive.
This board connects the jacks in a series configuration rather than in parallel. I can connect my Cabinet shield or my all-grain boards to this one, and then connect multiple thermometers.
Obviously, since the connections are in serial the devices must be plugged adjacent to one another. To achieve a fully serial topology, the microcontroller board should be connected to either end. Here are three thermometers connected to an Uno through the board.
Connections are confirmed using the OneWire address finder sketch.
This board worked without a hitch with three thermometers. Considering that my Cabinet worked fine with the prior configuration, I have no doubt it will handle all five. I doubt I’ll have cause to test the circuit with longer cables, which is reportedly a limiting factor for OneWire communications.
The only problem I had was with plug crimping. I bought solid core wire and universal plugs, but most of my crimps fail, usually involving the middle four wires. I suspect the plugs are too cheap or that I should have gone with stranded. I decided to use pre-terminated patch cables instead. I’ll soon be replacing the thermoelectric chips in my cabinet with an in-line electrical heating element, and will put one of these boards into operation in my cabinet at the same time.


